Set up and manage work areas, stay-out zones and transport paths with EPOS® wire free technology
Once your robotic lawn mower is installed, you can adjust your virtual boundaries in the Automower® Connect app, for example to edit a work area or create a stay-out zone, steering the lawn mower with appDrive as you go.
For first-time setup, including the charging station installation, lawn mower pairing and EPOS® setup, follow the step-by-step installation guide for your model and installation method: Install Automower® with EPOS® wire free technology.
Using appDrive
Show instructions
Show instructions
appDrive is the function in the Automower® Connect app that lets you steer Automower® remotely from your phone. It is used throughout the EPOS® installation to drive the lawn mower along boundaries and drop waypoints on the map to define work areas, stay-out zones and transport paths.
To use appDrive, you need to enable Remote Control on the lawn mower, and start appDrive in the Automower® Connect app.
How to enable appDrive on the lawn mower
Automower® Aspire™ R6, 308V and 312V
- Press the Stop button on the lawn mower.
- Enter the PIN code using the keypad if prompted.
- Press the Confirm button.
Automower® models with jogwheel
- Enter the PIN code by turning the jogwheel to each digit and pressing to confirm.
- Turn the jogwheel to Remote Control and press to confirm.
How to start appDrive in the app
- Open the Automower® Connect app.
- Tap the Start icon.
- Select appDrive.
Create a work area
Show instructions
Show instructions
A work area is where the lawn mower is allowed to mow. Watch this animation to see how points work as you create boundaries:
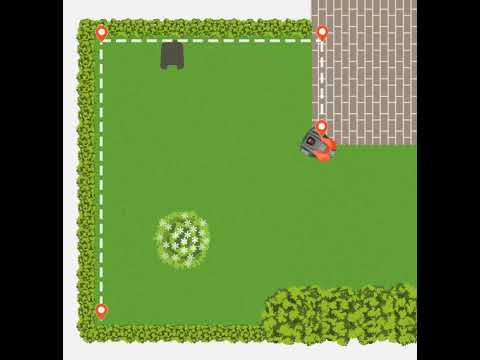
Steps to create a work area
- Go to the map section of the app.
- Select Add > Work area.
- Use appDrive to steer the lawn mower clockwise around the lawn.
- As you drive the lawn mower, drop points at corners or turns to create the boundary.
- Press Done to connect the last point to the first.
- Once you have created the boundary you can edit the points in the map view of the app.
When dropping points, focus on where you place each point, not on how the lawn mower drives between them. The app connects all points with straight lines to create your boundary.
Work area tips
- Plan before you create: Once created, work areas cannot be split into smaller areas later. However, you can edit individual waypoints with centimetre precision if you need to adjust boundaries.
- One work area: Choose this if you want the same schedule, mowing pattern and settings across your entire lawn. You can still create different Profiles within one work area to switch between different configurations. Learn more about Profiles: How to use Profiles in the Automower® Connect app.
- Multiple work areas: Create separate areas (for example: front garden, back garden, pool area) for maximum flexibility. Each work area can have:
- Individual schedules and cutting height settings
- Independent mowing patterns
Creating transport paths
Show instructions
Show instructions
When do you need a transport path?
You need a transport path if the charging station docking point is located outside a work area. The transport path guides the lawn mower between the docking point and the work area.
- Docking point inside the work area: No transport path needed
- Docking point outside the work area: Transport path required
- Multiple work areas: Each area that doesn’t include a docking point needs to be connected with a transport path
Steps to create a transport path
- Drive the lawn mower with appDrive to the work area you want to connect.
- If you want to connect several areas, start at the most remote work area (as seen from the charging station). You only need one transport path to connect all areas.
- Go to the map section of the app.
- Select Add > Transport path.
- Ensure that the starting point of the transport path is at least 1 m/3.3 feet inside the work area.
Transport path tips and best practices
- Make paths as wide as possible: Increase the path width in the app to give the lawn mower more room and improve navigation.
- Keep stay-out zones clear of transport paths: When travelling on a transport path, the lawn mower ignores work areas but will not pass through stay-out zones. Make sure no stay-out zone blocks the lawn mower’s transport path.
- Mowing is paused on transport paths: The lawn mower does not mow when it is following a transport path.
- Enable or disable transport paths: You can temporarily enable or disable transport paths in the Automower® Connect app.
- Connecting multiple work areas: You have two options:
- One shared transport path: A single transport path (B) can connect several work areas (C & D) and guide the lawn mower between them and the charging station docking point (A). When connecting multiple areas using one transport path, place at least one point inside each work area the path enters. For best results: Add an entry point where the path enters the area, and add an exit point where it leaves the area. The mower returns to the charging station docking point after completing each area and before proceeding to the next one.
- Separate transport paths: Create individual paths (B) from each work area (C & D) to the charging station docking point (A). The mower returns to the charging station docking point after completing each area and before proceeding to the next one.
Create stay-out zones
Show instructions
Show instructions
Create stay-out zones to prevent the lawn mower from going into certain areas.
Steps to create a stay-out zone
- Go to the map section of the app.
- Select Add > Stay-out zone.
- Use appDrive to steer the lawn mower anti-clockwise around the area to create a stay-out zone.
- Press Done to connect the last point to the first.
Stay-out zone tips
When creating stay-out zones, avoid configurations that block access or create unreachable areas:
- Minimum size: A stay-out zone must be at least 30 × 30 cm/1 × 1 ft.
- Slopes: Use stay-out zones to exclude slopes that are too steep for your lawn mower. Check the maximum slope for your lawn mower model.
- Obstacles: Stay-out zones are recommended around all obstacles, such as trees, roots and stones.
- Avoid narrow passages: When creating stay-out zones (A), avoid leaving narrow passages (B) that will become unreachable for the lawn mower.
- Prevent blocked areas: Ensure stay-out zones (A) don’t block parts of a work area (B) that will become unreachable for the lawn mower.
- Don’t block transport paths: Creating a stay-out zone across a transport path will prevent the lawn mower from reaching its destination.
Add, delete and edit points
Show guidelines
Show guidelines
Points, also referred to as waypoints, are the points you drop in the app to define the edges of your work areas, stay-out zones and transport paths. Watch the video to learn how to add points in the Automower® Connect app.
How to edit your boundaries:
- Ensure you are connected to the lawn mower via Bluetooth.
- Go to the map section of the app.
- Tap the work area or stay out-zone you want to edit.
- Scroll down to and tap Edit. If the Edit button is grey, it means you are not connected to Bluetooth.
- Add points: Select a line and tap the plus (+) symbol. Repeat to add more points if needed.
- Delete points: Tap the point you want to delete and select the Rubbish bin icon.
- Edit points: Select a point, choose your direction with the orange dot and set the distance using the slider. Points can be adjusted up to 5 metres/16 ft 4 in. at the time in each direction.
- Tap Save to save your changes.
About the docking point
Show instructions
Show instructions
What is the docking point?
The docking point is the position Automower® uses to locate and return to the charging station. When leaving the charging station, Automower® stops at the docking point before heading to the work area. When returning, it reaches the docking point and uses the signal from the charging station to navigate back.
How the docking point is created
The docking point is created during the initial installation. The app guides you through the process, including setting the reversing distance.
Can the docking point position be updated after initial setup?
The position of the docking point, so how far it drives when leaving the charging station, is fixed after installation. To change it, the charging station must be reinstalled.
To reinstall the charging station:
- In the app, go to the Map section > Map objects and scroll down.
- Tap Charging station > Reinstall.
- Follow the instructions in the app.
- A new docking point will be created, and you can anew select the lawn mower’s reversing distance from the charging station.
Docking point requirements
- Clear sky view: Position the charging station (A) so that the docking point (B) has a clear view of the sky (C). Leave at least 6 metres (20 feet) of free space in front of the charging station.
- Wi-Fi coverage (when using EPOS® via the Husqvarna Cloud): For lawn mower models that only support Wi-Fi (not mobile connectivity), stable coverage from your home Wi-Fi is required throughout the entire work area, including around the charging station, to complete the docking point setup.
Tips for setting the docking point distance
- Charging station near a wall or building: Set the distance to the maximum recommended length to improve satellite visibility at the docking point.
- Obstacles opposite the charging station: If there are buildings or structures across the lawn from the charging station, a shorter distance may give better satellite reception.
- Minimise track marks: A shorter distance also helps reduce visible track marks on the lawn near the charging station.
If you encounter problems creating the docking point, see: Unable to create docking point—Automower® with EPOS® wire free technology.
Related articles: Install Automower® with EPOS® wire free technology | Install virtual boundaries with Husqvarna EPOS®: Two installation options | Destination not reachable—EPOS® Technology error message