Automower® charging station: Optimal placement and mower house guide
Correct placement of the Automower® charging station is key to ensuring the efficient operation and longevity of your robotic lawn mower. This guide provides clear instructions to help you find the best location and install your Automower® charging station, whether you have an EPOS® wire free setup or a physical boundary wire installation. It also includes recommendations and tips for using a mower house to protect your mower.
General placement guidelines (applies to all installations)
These guidelines apply to both EPOS® and boundary wire installations:
These guidelines apply to both EPOS® and boundary wire installations:
Essential requirements
- Proximity to power outlet: Place the charging station near a power outlet.
- Level surface: Ensure that the charging station is on a level surface.
- Straight baseplate: The baseplate of the charging station must not be bent.
Optimal positioning
- Sun protection: Position the charging station in an area with protection from the sun or use an Automower® house.
- Central location: Ideally, place the charging station in a central location of the mowing area.
- Slope consideration: If the work area has two parts separated by a steep slope, place the charging station in the lower section.
Technical considerations
- Metal interference: Avoid having metal objects near the station (e.g., reinforcement bars, metal edging, coils of low‑voltage cable) as they may interfere with the charging station signal.
- Wi-Fi coverage: For Automower® models that communicate with the Husqvarna Cloud only using Wi-Fi, place the charging station within Wi-Fi range for download of firmware updates.
For EPOS™ wire free installations
When installing Automower® with EPOS™ technology, follow these guidelines:
When installing Automower® with EPOS™ technology, follow these guidelines:
Where to place the charging station
- Free space: Maintain at least 6 m/20 ft. of free space in front of the charging station (C).
- Unimpeded sky view: Position the charging station (A) so that the docking point (B) has an unimpeded sky view. The docking point (B) is where the mower stops after leaving the charging station.
- Reversing distance: Set the reversing distance according to your model:
- For Automower® NERA mowers: 70–250 cm/28–98 in.
- For Automower® 435X AWD NERA: 100–250 cm / 40–98 in.
- Work area positioning: Place the charging station inside the work area (A) or outside (B). If placed outside (B), create a transport path (C) to the charging station during virtual boundary setup.
How to install
For a detailed guide on EPOS wire free installations, including steps for placing and installing the charging station for your specific Automower® model, follow our step-by-step instructions.
For physical boundary wire installations
When installing Automower® with a physical boundary wire, follow these guidelines:
When installing Automower® with a physical boundary wire, follow these guidelines:
Where to place the charging station
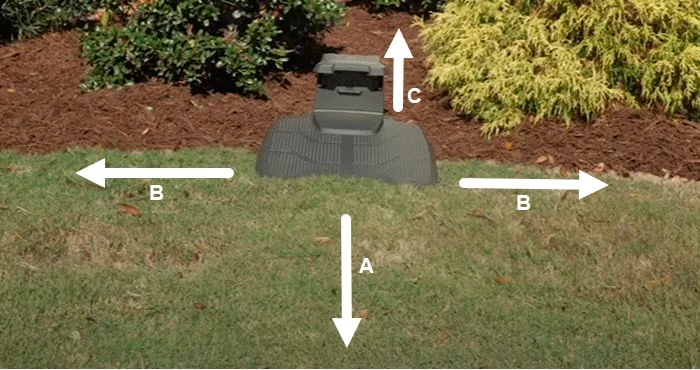
- Free space: Keep a minimum 3 m/10 ft. of free space in front of the charging station (A).
- Side clearance: Keep a minimum of 150 cm/60 in. of free space to the right and left of the centre of the charging station (B).
- Rear clearance: Keep a minimum of 60 cm/2 ft. of free space behind the charging station (C).
- Island installation: If the charging station is installed on an island, connect the guide wire to the island.
- Verification: Do not secure the charging station to the ground until you have installed all the wires and verified that your installation works.
- Metal interference: Avoid having metal objects near the station and wires (e.g., reinforcement bars, metal edging, coils of low‑voltage cable) as they may interfere with the charging station signal.
How to install
For a detailed guide on physical boundary wire installations, including tips for placing and installing the charging station, follow our step-by-step instructions.
Automower® House vs alternative covers
Recommendations and tips for Automower® House and alternative covers:
Recommendations and tips for Automower® House and alternative covers:
Recommendation
The Husqvarna Automower® House is designed to protect your robotic lawn mower from long-term effects of rain and sun exposure. Its foldable top provides easy access to mower controls while charging, and wire connections are accessible via the rear cable hatch.
While alternative shelters such as DIY covers, roofs, canopies or structures made from wood or metal may work, they are not tested or verified by Husqvarna and could potentially interfere with mower functionality.
Charging station house checklist
If using any cover, shelter or roof for your charging station, ensure it meets these requirements:
- Clearance: Maintain free space around the front, sides and rear based on your installation type (EPOS® or wired).
- Docking: Ensure the mower can enter, align and reverse into the station without obstructions.
- Ventilation and temperature: Ensure open sides and good ventilation to avoid heat build-up. Do not put the power supply in an enclosed box.
- Drainage and load: Allow water to drain properly. Ensure under-deck framing doesn’t deform the baseplate.
- Metal interference: Metal objects near the station and wires (e.g., reinforcement bars, metal edging, coils of low‑voltage cable) may interfere with the charging station signal.
- EPOS® installations: You may place the charging station under a roof if the docking point has clear sky view and the front free space is maintained.
- Mower house setting: If your model supports it, enable “Mower house” in the Automower® Connect app (More > Settings > Accessories > Mower house) to prevent collisions. Note: This may result in a small uncut area near the house.
Charging station LED status
Understand what the different charging station LED colours mean:
Understand what the different charging station LED colours mean:
- Solid green: Normal operation (working as expected)
- Flashing green: ECO mode is active (energy-saving feature)
- Solid blue: Weak boundary wire signal (may still operate normally)
- Flashing blue: No loop signal detected (troubleshooting required)
- Flashing yellow: Guide wire broken or disconnected (repair needed)
- Solid red: Circuit board or power supply issue (service required)
- Flashing red: Antenna wire damaged (professional repair needed)
- No light: Power supply problem (troubleshooting needed)