How to inspect and replace blades on a ride-on mower
Keeping the blades on your Husqvarna ride-on mower in good condition is essential for a clean, even cut and for your safety. Dull, damaged or unbalanced blades can affect cutting performance and cause damage to your ride-on mower.
This step-by-step guide shows you how to examine and replace ride-on mower blades on both petrol and battery-powered Husqvarna ride-on mowers.
Why blade maintenance is important
If your lawn looks uneven after mowing or you hear unusual vibrations, your ride-on mower blades may be blunt or damaged.
Regular inspection and replacement when required ensures your mower works efficiently and safely.
- Blunt blades tear grass instead of cutting cleanly.
- Damaged or unbalanced blades can cause mechanical issues.
- Incorrect blade installation can result in injury or deck damage.
CAUTION: Always wear protective gloves when handling blades.
How to examine ride-on mower blades
For petrol ride-on mower
For petrol ride-on mower
- Move the cutting deck to the service position.
- Visually inspect each blade for cracks, dents or dull edges.
- If blades are damaged or unbalanced, they must be replaced.
- Check and tighten the blade bolt using the correct torque. For your specific model, refer to the product’s operator’s manual.
For battery ride-on mower
For battery ride-on mower
- Put the cutting deck in service position
- Visually inspect each blade for cracks, dents or dull edges.
- Check and tighten the blade bolt using the correct torque. For your specific model, refer to the product’s operator’s manual.
How to replace blades on a ride-on mower
CAUTION: Use only original Husqvarna blades specific to your ride-on mower model. Incorrect or unbalanced blades can eject debris from the deck and cause injury.
TIP: If blades appear dull but not damaged, contact your local authorised dealer for sharpening and balancing.
For petrol ride-on mower
For petrol ride-on mower
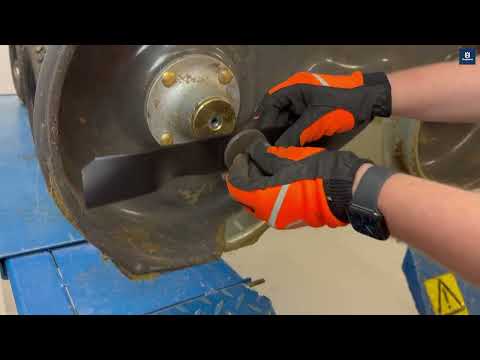
- Move the cutting deck into the service position.
- Use a wooden block to lock the blade in place and prevent rotation.
- Loosen and remove the blade bolt, washers and blade.
- Position the new blade with the angled ends facing towards the cutting deck.
- Reattach the blade, washers and bolt.
- Tighten the bolt to the torque setting listed in your product’s operator’s manual.
For battery ride-on mower
For battery ride-on mower
- Put the cutting deck in service position
- Lock the blade using a wooden block.
- Remove the blade bolt, washers, blade and blade support.
- Align and install the new blade with the bent edges facing the deck.
- Reassemble with the washers and bolt, then tighten using the specified torque. For your specific model, refer to the product’s operator’s manual.


