How to create work areas, stay-out zones and transport paths with EPOS® wire free technology
In EPOS® wire free installations, you can create and modify your lawn setup anytime directly in the Automower® Connect app. This guide shows you how to add work areas, create stay-out zones and set up transport paths with centimetre precision.
Understanding points
Show guidelines
Show guidelines
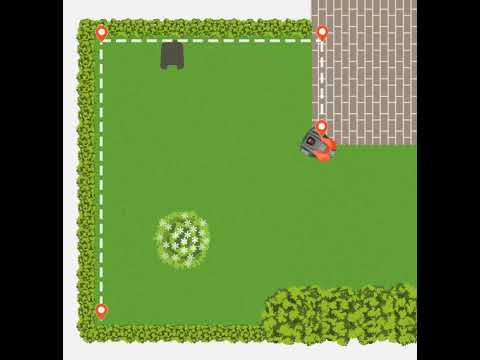
Points, sometimes also referred to as waypoints, are the points you drop in the app to define the edges of your work areas, stay-out zones and transport paths. Here are important guidelines when placing them:
- Minimum distance: The distance between points shall not be less than 0.3 metres/12 in.
- Corner angles: Do not create sharp corners when setting points. Corners should not be less than 90 degrees.
- Total limit: The number of points for the total installation is limited to 1000 points. By reducing the number of points, you help the mower to efficiently calculate the area.
- Adding and editing: By selecting a line in your work area, you can add a new point. Points can be deleted or adjusted with centimetre-precision in the app. They can be adjusted up to 5 metres/16 ft 4 in. at a time in each direction. Note that you need to be connected to the lawn mower via Bluetooth to edit areas.
- Focus on placement: When dropping points, focus on where you place each point, not on how the lawn mower drives between them. The app connects all points with straight lines to create your boundary.
Create a work area
Show instructions
Show instructions
A work area is where the lawn mower is allowed to mow. Watch this animation to see how points work as you create boundaries:
Steps to create a work area
- Go to the map section of the app.
- Select Add > Work area.
- Use appDrive to steer the lawn mower clockwise around the lawn.
- As you drive the lawn mower, drop points at corners or turns to create the boundary.
- Press Done to connect the last point to the first.
- Once you have created the boundary you can edit the points in the map view of the app.
Work area tips
- Plan before you create: Once created, work areas cannot be split into smaller areas later. However, you can edit individual waypoints with centimetre precision if you need to adjust boundaries.
- One work area: Choose this if you want the same schedule, mowing pattern and settings across your entire lawn. You can still create different Profiles within one work area to switch between different configurations. Learn more about Profiles: How to use Profiles in the Automower® Connect app.
- Multiple work areas: Create separate areas (for example: front garden, back garden, pool area) for maximum flexibility. Each work area can have:
- Individual schedules and cutting height settings
- Independent mowing patterns
Create stay-out zones
Show instructions
Show instructions
Create stay-out zones to prevent the lawn mower from going into certain areas.
Steps to create a stay-out zone
- Go to the map section of the app.
- Select Add > Stay-out zone.
- Use appDrive to steer the lawn mower anti-clockwise around the area to create a stay-out zone.
- Press Done to connect the last point to the first.
Stay-out zone tips
When creating stay-out zones, avoid configurations that block access or create unreachable areas:
- Avoid narrow passages: When creating stay-out zones (A), avoid leaving narrow passages (B) that will become unreachable for the lawn mower.
- Prevent blocked areas: Ensure stay-out zones (A) don’t block parts of a work area (B) that will become unreachable for the lawn mower.
- Don’t block transport paths: Creating a stay-out zone across a transport path will prevent the lawn mower from reaching its destination.
Creating transport paths
Show instructions
Show instructions
When do you need a transport path?
You need a transport path if the charging station docking point is located outside a work area. The transport path guides the lawn mower between the docking point and the work area.
- Docking point inside the work area: No transport path needed
- Docking point outside the work area: Transport path required
- Multiple work areas: Each area that doesn’t include a docking point needs to be connected with a transport path
Steps to create a transport path
- Drive the lawn mower with the appDrive to the work area you want to connect.
- If you want to connect several areas, start at the most remote work area (as seen from the charging station). You only need one transport path to connect all areas.
- Go to the map section of the app.
- Select Add > Transport path.
- Ensure that the starting point of the transport path is at least 1 m/3.3 feet inside the work area.
Transport path tips and best practices
- Mowing is paused on transport paths: The lawn mower does not mow when it is following a transport path.
- Enable or disable transport paths: You can temporarily enable or disable transport paths in the Automower® Connect app.
- Make paths as wide as possible: Increase the path width in the app to give the lawn mower more room and improve navigation.
- Keep stay-out zones clear of transport paths: When travelling on a transport path, the lawn mower ignores work areas but will not pass through stay-out zones. Make sure no stay-out zone blocks the lawn mower’s transport path.
- Connecting multiple work areas: You have two options:
- One shared transport path: A single transport path (B) can connect several work areas (C & D) and guide the lawn mower between them and the charging station docking point (A). When connecting multiple areas using one transport path, place at least one point inside each work area the path enters. For best results: Add an entry point where the path enters the area, and add an exit point where it leaves the area. The lawn mower will move directly from one area to the next without returning to the charging station between areas.
- Separate transport paths: Create individual paths (B) from each work area (C & D) to the charging station docking point (A). In this setup, the lawn mower returns to the station after completing each area instead of travelling directly between work areas.
Related articles: Install Automower® with EPOS® wire free technology | Install virtual boundaries with Husqvarna EPOS®: Two installation options | Destination not reachable—EPOS® Technology error message